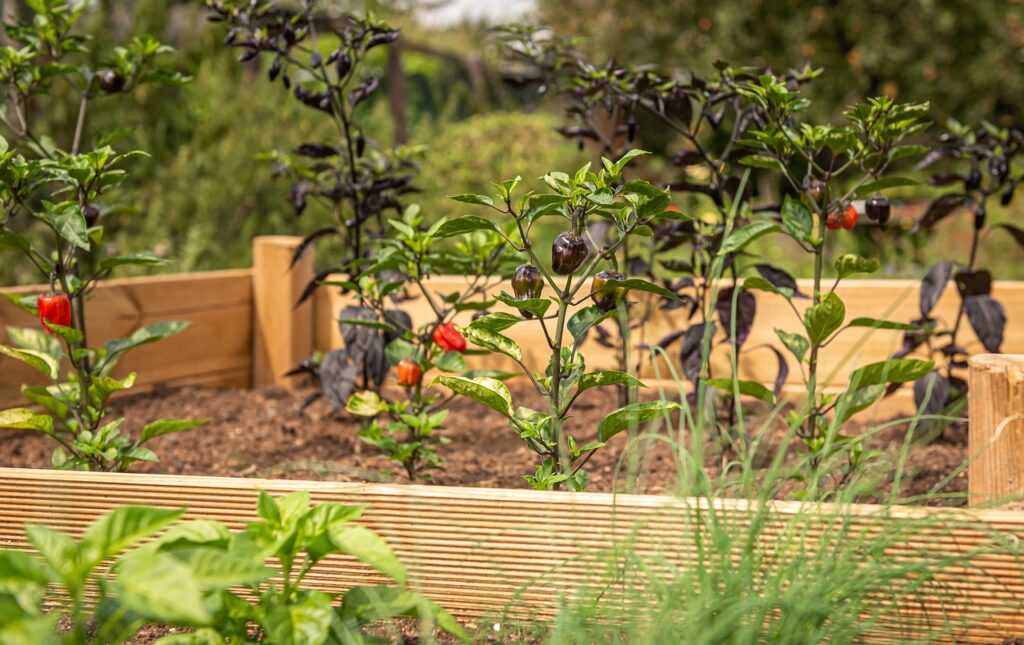
Why Raised Beds Make Sense
Raised garden beds aren’t just a trend they solve real problems. By building up instead of digging down, you get total control over your soil. That means you’re not stuck dealing with compacted, rocky, or nutrient starved ground. Instead, you choose the mix that works best for your plants, helping roots grow strong and harvests stay healthy.
Weeds? Raised beds reduce them dramatically. You’re starting fresh with clean soil and often adding a barrier at the bottom. That creates an environment where weeds struggle to take hold. Plus, drainage improves. Water flows better in a raised setup, especially if your native soil is heavy clay or prone to pooling.
And let’s get practical: raised beds are easier on your body. Less bending over means less back and knee strain. Garden longer, more comfortably, without needing to sprawl flat to pull a carrot.
Choose the Right Location
Finding the ideal spot for your raised garden bed is the first step toward a thriving, low maintenance garden. Here’s how to assess your space and select a location that gives your plants the best chance to succeed.
Sunlight: Match Light Levels to Plant Needs
Most vegetables and herbs require at least 6 8 hours of direct sunlight per day. However, some leafy greens, like lettuce or spinach, can tolerate partial shade.
Full sun: Best for tomatoes, peppers, squash, and root vegetables
Partial shade: Works well for leafy greens and herbs
Observation tip: Watch how sunlight falls on your chosen area throughout the day before finalizing your bed location
Avoid Problem Areas
Not all yard spaces are created equal. Some areas can create more trouble than they’re worth.
Avoid low lying spots where water accumulates after heavy rain
Steer clear of overly windy zones unless you plan to install wind protection
Check for nearby trees roots may start invading your bed space over time
Think About Water Access
Consistent and convenient watering is essential, especially during the hot summer months.
Position your bed within reach of a hose or spigot
Avoid areas that require complex irrigation simplicity keeps you motivated to maintain
If you’re using rain barrels or timers, consider those placements too
Selecting the right location isn’t just about sunlight it’s about creating the most seamless experience possible for both you and your plants.
Materials That Work Hard
Not all raised bed materials are created equal some cost more, others last longer, and a few might quietly leach things you don’t want near your tomatoes.
Start with wood. Treated lumber used to be off limits because of toxic chemicals like arsenic. But modern pressure treated wood is usually safer for gardening, thanks to updated regulations and safer preservatives. Still, if you want total peace of mind, go with untreated wood.
Cedar and redwood are naturally rot resistant, weather well, and don’t need treatment which is why they’re go to choices for many DIY gardeners. They cost more up front but hold their shape and integrity for years. Recycled composite boards made from plastic and wood fibers are another solid option. They’re durable, can look pretty sleek, and won’t rot or warp. Just be sure they’re labeled as food safe if that matters to you.
If wood’s not your angle, get creative. Old bricks, concrete pavers, and cinder blocks are heavy duty and often free if you know where to look. Galvanized metal works great too think stock tanks or custom cut sheets just make sure it’s not coated in anything weird and that it won’t overheat your soil in full sun.
Long story short: pick what fits your budget, space, and comfort level. Your kale doesn’t care what it grows in, as long as you get the basics right.
Building It Yourself
You don’t need a landscaping crew or a shed full of tools to build a solid raised garden bed. Stick to durable materials, keep the layout clean, and follow these basic steps.
Standard Dimensions That Work
Most home gardeners do well with beds that are 4 feet wide and 6 to 8 feet long. Why four feet? Because that lets you reach the middle from either side without trampling your soil. Keep your bed no taller than 12 to 18 inches unless you’re filling it with a deep root mix or working on super rocky ground.
Tools and Hardware Checklist
Nothing fancy here. You’ll need:
Power drill or screwdriver
Hand saw or circular saw (depending on your material)
Tape measure
Level
Stakes and string (for marking)
Weed barrier fabric
Screws or galvanized nails (3” are standard)
Landscape staples (for weed barrier)
Optional but helpful:
Shovel or garden fork
Wheelbarrow
Rubber mallet (for frame fit)
Step by Step Build Breakdown
Marking and Leveling the Site
Pick your spot. Use string and stakes to mark the outline, then dig or rake to level the area. Beds need to sit flat, especially if stacked with multiple boards.
Assembling the Frame
Measure your boards, cut them if needed, then screw or nail at the corners. Reinforce longer sides with a center stake to prevent bowing. Double check corners are square.
Adding Weed Barrier or Fabric
Cut and spread your fabric across the base. Secure the edges with landscape staples. If you’re using cardboard, overlap layers and soak them nature will handle the rest.
Filling with Soil Layers
Start with some coarse organic material (old sticks, rough compost) for drainage. Add your soil mix in layers, breaking up clumps and watering lightly between fills. Fill to just below the top of the frame to prevent spillover when watering.
And that’s it. Raised bed, ready to grow.
Best Soil Mix for Success

Healthy plants start with healthy soil. For raised beds, the ideal mix is one that stays loose, drains well, and holds nutrients. Go with a simple blend: 40% topsoil, 40% compost, and 20% vermiculite. Topsoil brings structure and minerals, compost feeds the plants with essential organic matter, and vermiculite helps retain moisture without getting soggy.
Depth matters too. Aim for at least 12 inches of soil to give roots enough room to grow deep and strong. Shallow beds stunt plant development and dry out faster. If you’re growing root crops like carrots or beets, even more depth closer to 18 inches is better.
Soil doesn’t stay perfect forever. By mid season, or before each new planting cycle, top things up with fresh compost or a balanced organic mix. If the soil looks compacted or your plants feel sluggish, it’s time for a refresh. Treat your soil like an asset it’s the foundation of everything you grow.
Bonus Tip: Small Space Gardening
Space shouldn’t limit your harvest. Raised beds already give you better soil and structure why not take them vertical too? Adding height means more plants in the same footprint. That’s where trellises, hanging setups, and stackable planters come in. They’re functional, easy to install, and perfect for crops like beans, cucumbers, or even strawberries.
Try mounting a trellis to the back edge of your bed or lean one against a fence behind it. Stackable planters can sit along the sides or corners, giving herbs or greens their own levels. Simple solutions, bigger garden.
Want ideas you can actually build this weekend? Check out these vertical planter ideas to expand your growing space.
What to Plant First
Raised beds are prime spaces for crop success if you plant smart. Start with the classics: lettuces, carrots, tomatoes, and herbs. These thrive in the loose, well drained soil raised beds provide. Lettuces grow fast and don’t mind cooler soil. Carrots need depth and room to root, which beds offer in spades. Tomatoes love the warmth and airflow. And herbs think basil, thyme, parsley do well in confined spots and reward you repeatedly with fresh cuttings.
Now layer in companion planting. This isn’t folklore it works. Pair tomatoes with basil to boost flavor and repel pests. Carrots and onions make good neighbors, confusing each other’s predators. Avoid mixing crops that draw the same pests or compete for nutrients. Diversity is your invisible armor.
Rotation matters too. Resist the temptation to plant the same thing in the same spot every season. Swap plant families leafy greens one year, legumes the next, root crops after that. This breaks pest cycles and keeps your soil nutrients in balance. Raised beds play by the same rules as in ground gardens ignore them, and you’ll pay for it later in stunted plants and hungry bugs.
Keep It Growing
Once your raised bed is planted, the real work begins. Keeping your garden productive comes down to a few daily habits that go a long way.
Start with watering. Plants don’t need the same amount every day. Mornings are best, and in cooler months, 2 3 times a week might be enough. In hotter months, check the soil daily if the top inch stays dry, water more often. Try drip irrigation for steady moisture without overdoing it.
Next, mulch. A 2 3 inch layer of organic mulch like shredded leaves or straw locks in moisture, regulates soil temperature, and blocks weeds. As it breaks down, it feeds the soil too. Top it up every couple of months or after heavy rain.
Feeding is simple. A monthly dose of organic compost or mix in of worm castings will enrich the soil and keep plants growing strong. No need to overdo it just think of it as a steady diet rather than a feast.
Finally, stay ahead of pests. Take five minutes every few days to scan your plants. Look under leaves for eggs, watch for chewed spots, and remove anything suspicious by hand. For recurring issues, neem oil or insecticidal soap can help just follow directions and go easy.
With a little ongoing care, your raised bed won’t just start strong it’ll thrive.
Built It? Grow It.
Finished your raised bed? Good. Now hit record. Whether it’s a five second time lapse or a no frills voiceover walk through, documenting your build does more than just show off your handiwork it helps others learn and inspires them to start. Share what worked, what didn’t, and that one corner that still leans a little. Authentic beats perfect.
From there, look up literally. Stacking your harvest with vertical setups is a smart way to stretch limited space. Trellises, hanging pots, or even wall mounted planters let you grow up without giving up square footage. Cucumbers, peas, strawberries they all climb or cascade with a little support. Add a few vertical pieces and you’re not just gardening, you’re engineering.
Need more ideas to build up instead of out? Explore more vertical planter ideas here.
 There is a specific skill involved in explaining something clearly — one that is completely separate from actually knowing the subject. Quenlisa Zephoria has both. They has spent years working with sustainable home practices in a hands-on capacity, and an equal amount of time figuring out how to translate that experience into writing that people with different backgrounds can actually absorb and use.
Quenlisa tends to approach complex subjects — Sustainable Home Practices, DIY Garden Projects, Home and Garden Trends being good examples — by starting with what the reader already knows, then building outward from there rather than dropping them in the deep end. It sounds like a small thing. In practice it makes a significant difference in whether someone finishes the article or abandons it halfway through. They is also good at knowing when to stop — a surprisingly underrated skill. Some writers bury useful information under so many caveats and qualifications that the point disappears. Quenlisa knows where the point is and gets there without too many detours.
The practical effect of all this is that people who read Quenlisa's work tend to come away actually capable of doing something with it. Not just vaguely informed — actually capable. For a writer working in sustainable home practices, that is probably the best possible outcome, and it's the standard Quenlisa holds they's own work to.
There is a specific skill involved in explaining something clearly — one that is completely separate from actually knowing the subject. Quenlisa Zephoria has both. They has spent years working with sustainable home practices in a hands-on capacity, and an equal amount of time figuring out how to translate that experience into writing that people with different backgrounds can actually absorb and use.
Quenlisa tends to approach complex subjects — Sustainable Home Practices, DIY Garden Projects, Home and Garden Trends being good examples — by starting with what the reader already knows, then building outward from there rather than dropping them in the deep end. It sounds like a small thing. In practice it makes a significant difference in whether someone finishes the article or abandons it halfway through. They is also good at knowing when to stop — a surprisingly underrated skill. Some writers bury useful information under so many caveats and qualifications that the point disappears. Quenlisa knows where the point is and gets there without too many detours.
The practical effect of all this is that people who read Quenlisa's work tend to come away actually capable of doing something with it. Not just vaguely informed — actually capable. For a writer working in sustainable home practices, that is probably the best possible outcome, and it's the standard Quenlisa holds they's own work to.