Giving wood or metal a smooth, professional finish can transform any project. It is important to use the proper techniques in refinishing furniture, restoring metal fixtures, or a DIY project. Novices find it difficult to cope with uneven surfaces, scratches, or rough edges.
The right choice of tools and suitable steps will guarantee a high-quality, coherent output. The straightforward preparation, proper sanding, and appropriate finishing procedures help to avoid expensive mistakes.
Knowing the most important tricks, any person will be able to make the work look professional. This is a guide to practical tips on sanding, smoothing, and finishing the surface of wood and metal efficiently and effectively.
Clean up the Surface
It is always a good idea to clean the surface beforehand. Eliminate dust, grease, or rust that might be in the way of sanding or finishing. In the case of wood, use a wood filler to fill the holes or cracks. It should be left to dry out and then sanded.
In the case of metal, a wire brush or steel wool can be used to remove rust and old paint. The finish should be evenly applied, and this is possible by proper preparation.
Select the Appropriate Sandpaper
The choice of sandpaper is very important for a smooth finish. Coarse grit takes a short time to clear off the imperfections but leaves scratches. Fine grit polishes the surface and finishes it. Begin with a smaller grit and progress to greater grits. It helps avoid deep scratches and achieves a polished finish.
Various materials need different kinds of sandpaper. Wood normally works with aluminum oxide, whereas metal might be best treated using silicon carbide.
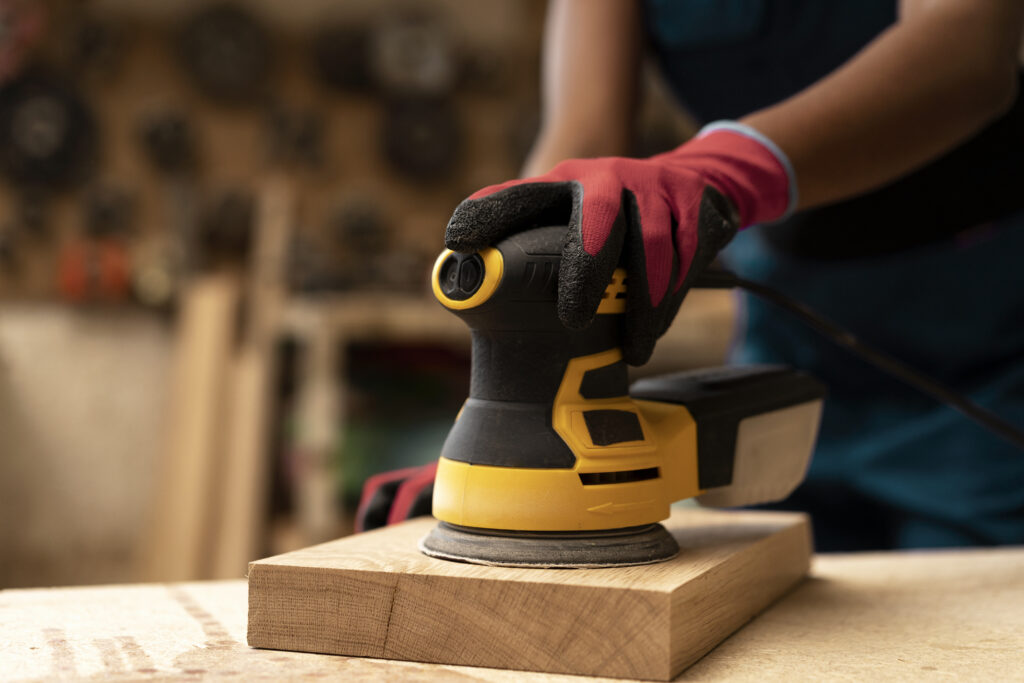
Use a Quality Sander
A good sander enhances efficiency and uniformity. Electric sanders are time savers and offer a smooth finish. One of them is a Makita sander from Sydney Tools. This tool provides accurate control, easy operation, and appropriate speed settings of various materials.
A good sander minimizes weariness and results in a professional appearance. It also assists in reaching corners and tricky spots that hand sanding may not reach.
Sand With the Grain
In the case of wood, always sand with the grain rather than against it. Graining against can result in scratches that are difficult to remove when used in furniture making. In the case of metal, adhere to the form of the object. The circles or forward and back strokes operate based on the surface.
Regular sanding patterns avoid any irregularities and simplify the finishing procedure.
Clean Between Sanding Steps
Wipe the surface after each sanding process using a clean cloth. This removes dust that might scratch the surface in the subsequent sanding process.
On metal, compressed air or a soft brush is used to remove fine particles. Clean surfaces guarantee enhanced sticking of paints, stains, or varnishes.
Inspect and Touch Up
Once the final coat is applied, check out the surface in terms of irregularities or roughness. Lightly sand and apply additional coats if necessary. Even minor touches can be very important in the quality of the finish. These steps ensure that there is a professional finish on the wood and metal projects.
 Carmena Coyleris has opinions about creative inspirations. Informed ones, backed by real experience — but opinions nonetheless, and they doesn't try to disguise them as neutral observation. They thinks a lot of what gets written about Creative Inspirations, Home and Garden Trends, Outdoor Living Solutions is either too cautious to be useful or too confident to be credible, and they's work tends to sit deliberately in the space between those two failure modes.
Reading Carmena's pieces, you get the sense of someone who has thought about this stuff seriously and arrived at actual conclusions — not just collected a range of perspectives and declined to pick one. That can be uncomfortable when they lands on something you disagree with. It's also why the writing is worth engaging with. Carmena isn't interested in telling people what they want to hear. They is interested in telling them what they actually thinks, with enough reasoning behind it that you can push back if you want to. That kind of intellectual honesty is rarer than it should be.
What Carmena is best at is the moment when a familiar topic reveals something unexpected — when the conventional wisdom turns out to be slightly off, or when a small shift in framing changes everything. They finds those moments consistently, which is why they's work tends to generate real discussion rather than just passive agreement.
Carmena Coyleris has opinions about creative inspirations. Informed ones, backed by real experience — but opinions nonetheless, and they doesn't try to disguise them as neutral observation. They thinks a lot of what gets written about Creative Inspirations, Home and Garden Trends, Outdoor Living Solutions is either too cautious to be useful or too confident to be credible, and they's work tends to sit deliberately in the space between those two failure modes.
Reading Carmena's pieces, you get the sense of someone who has thought about this stuff seriously and arrived at actual conclusions — not just collected a range of perspectives and declined to pick one. That can be uncomfortable when they lands on something you disagree with. It's also why the writing is worth engaging with. Carmena isn't interested in telling people what they want to hear. They is interested in telling them what they actually thinks, with enough reasoning behind it that you can push back if you want to. That kind of intellectual honesty is rarer than it should be.
What Carmena is best at is the moment when a familiar topic reveals something unexpected — when the conventional wisdom turns out to be slightly off, or when a small shift in framing changes everything. They finds those moments consistently, which is why they's work tends to generate real discussion rather than just passive agreement.